
If you’re gardening here in Papamoa, Mount Maunganui, or anywhere across the wider Bay of Plenty, you know the struggle. You spend hours preparing a new garden space, plant your precious seedlings, and then watch as the summer sun turns your soil into concrete or the winter rain transforms it into an unworkable, sticky sludge.
We understand the frustration. At Gardenscape Landscape Supplies, we’ve helped thousands of Kiwi gardeners conquer this exact issue. The problem isn’t your gardening skills; it’s the unforgiving nature of heavy clay soil.
The fact is, clay soil is rich in minerals, but its structure is fundamentally flawed. Those fine clay particles pack together so tightly that they starve roots of oxygen and prevent water from draining, leading to root rot and nutrient lockout. This isn’t just about hard work—it’s about having the right strategy and the right materials.
We are here to tell you that you don’t have to settle for shallow-rooted, struggling plants. As the local experts in landscape supplies, we’ve codified the solution into a clear, three-step process that will dramatically improve your garden beds this weekend.
Here is our masterclass on how to break up clay soil NZ homeowners can follow to create truly productive, thriving gardens.
Step One: The Physical Breakup and Aeration (Get the Air Moving)
Before you can add any amendments, you must physically break up the compacted layers. This process is non-negotiable, and it separates serious gardeners from those who quit after the first rain.
Clay is notorious for forming a dense pan beneath the surface. If you simply layer good soil on top, you’re creating a “bathtub” that holds water, making root rot inevitable.
The Right Way to Dig
- Start Deep: Use a garden fork or a broadfork, not a spade. A spade will slice the clay and create more smooth, slick sides, which only worsen the drainage problem. The fork tears and fractures the clay.
- Work in Sections: Drive the fork deep into the soil (at least 30-40 cm) and gently rock it back and forth to lift and fracture the clay structure. Do not turn the soil over. The goal is to create tiny channels and air pockets throughout the entire depth of the bed.
- Avoid Walking on Wet Clay: Never step on the garden bed after tilling. Clay is incredibly sensitive to compression. If you compress it again, all that hard work is undone. Use planks or crawlboards if you must work within the bed.
Once the soil is physically fractured, you have opened the door for our next crucial amendment.
Step Two: The Chemical Catalyst—Unlocking Clay with Gypsum
When homeowners ask us how to break up clay soil NZ wide, our first technical recommendation is always gypsum.
While manual labour introduces air pockets, those pockets will quickly collapse again unless you permanently change the soil structure. This is where calcium sulfate, or gypsum, comes in.
What Does Gypsum Do for Clay Soil?
Gypsum is not a fertiliser; it’s a flocculant. Clay particles have a negative electrical charge and naturally repel each other, which keeps them suspended in water or tightly packed when dry. The calcium in gypsum for clay soil acts like a molecular magnet. It neutralises that charge, causing the microscopic clay particles to bind together into larger, stable clusters called “floccules” or aggregates.
These new, larger clumps are porous. They create permanent spaces in the soil structure that allow water to drain quickly and, more importantly, let oxygen flow down to the root zone.
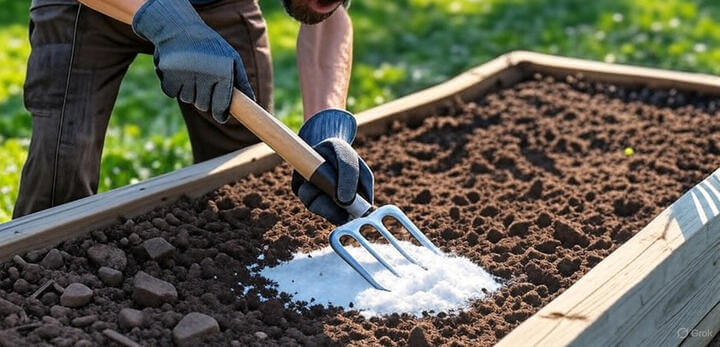
How to Apply Gypsum
For an established garden bed (or a new one):
- Dose Rate: Apply granulated gypsum at a rate of approximately 500g to 1kg per square metre for heavy clay. For lighter clay, start closer to 500g.
- Broadcast and Rake: Broadcast the gypsum evenly over the surface of the fractured soil. Use a light rake to incorporate it into the top 5-10 cm.
- Let Nature Do the Work: The calcium requires moisture to migrate and react with the clay particles. Water the area well, or simply wait for the next Papamoa rain shower. You will see the best results over a couple of weeks, but the process is passive – you don’t have to keep digging!
Important Note: Check Your Local Soil Type. Gypsum only works effectively on sodic clay (clay high in sodium). Most NZ coastal and heavy inland clays are sodic, making this a safe and reliable first step. If you want to be certain of your composition, consulting a regional soil map is recommended. Knowing your exact soil composition gives you confidence in your amendment approach. You can view the Bay of Plenty Regional Council’s interactive soil data here.
Step Three: The Organic Foundation—Knowing When to Use Compost vs. Topsoil
Once the physical structure is fractured and chemically treated with gypsum, the final step is to permanently stabilise the bed and supercharge its fertility. This involves adding organic matter, and the choice between compost vs topsoil NZ gardeners face is critical.
You cannot simply add gypsum and stop; you must incorporate massive amounts of organic matter to keep the structure open and feed the soil microbes.
The Case for Compost (The MVP)
Compost is, without a doubt, the single most valuable additive for clay soil.
- Aeration: The chunky, diverse material in compost creates large pores and channels, physically preventing the tight clay particles from recombining. This provides superior, long-lasting aeration.
- Water Management: Compost acts like a sponge. In winter, it absorbs excess water that the clay sheds; in summer, it retains moisture, preventing the clay from drying out and turning rock-hard.
- Fertility: Compost introduces essential nutrients and millions of beneficial microorganisms that continue to break down matter, constantly improving the soil structure from the inside out.
For a true clay transformation, you need to incorporate a deep layer of premium, high-quality finished compost.
When to Use Topsoil
Topsoil is high-quality earth, often blended with some compost or sand, designed to provide a rich base for planting.
The best time to use topsoil is when:
- You need to raise the level: If you are building a raised bed or bringing a sunken area up to grade, a layer of our premium screened topsoil provides bulk and consistency.
- You are starting a lawn: Lawns require a uniform, stone-free base, and our screened topsoil blend is ideal for seeding or turfing.
- As a mixer: You should never use pure topsoil alone to amend heavy clay. It often contains a percentage of clay itself.
The Winning Strategy: A 50/50 Power Blend
The authoritative approach is to create a dynamic, custom-made growing medium.
After applying gypsum and fracturing the native clay, we recommend a heavy incorporation of a 50% premium compost and 50% high-quality topsoil mix.
- Spread the Layers: Add a layer of compost and a layer of topsoil over the fractured clay base (aim for a total depth of 15-20 cm of additive).
- Mix Deeply: Using your garden fork, aggressively mix this new blend into the top 20-30 cm of the native clay. The goal is a gradual transition zone, not a hard line between the new mix and the old clay. This ensures water moves smoothly through the profile.
This blend gives you the mineral depth and consistency of topsoil while providing the vital, long-term structure and biology supplied by the compost.
Your Clay Soil Action Plan for this Weekend
Don’t let Bay of Plenty clay define your gardening success. By treating your heavy ground with these three expert steps, you move beyond temporary fixes to permanent soil remediation.
- Fracture: Use a fork to tear and aerate the native clay deeply (30-40 cm).
- Flocculate: Apply gypsum for clay soil at 1kg per square metre and water it in.
- Fortify: Aggressively mix a 50/50 blend of our premium compost and topsoil into the prepared clay.
Ready to conquer your clay? The solution starts today.
Don’t waste another season fighting hard, compacted soil. Visit the Gardenscape Landscape Supplies yard in Papamoa this weekend. Our expert team is ready to load you up with the right quantities of premium compost and bagged garden mix tailored for your project. Skip the guesswork – start building your dream garden now!